Diy Decorative Bulletin & Photo Board

A Love Worth Living For | Diy Decorative Framed Bulletin & Photo Board - Do it Yourself Thrifted Framed Inspiration & Vision Board.

I have another DIY Project for those awesome thrifted frames! If you missed the Framed Dry Erase Calendar that I did last month click

here

to see it! We've seen the frames with the strings or twine used to create a similar look but I wanted something far more decorative for the empty wall I had in my craft room. Here's how I made it!

A Love Worth Living For | Diy Decorative Framed Bulletin & Photo Board - Do it Yourself Thrifted Framed Inspiration & Vision Board.

This is another one of the huge frames that I picked up from a thrift store. I go to those thrift store associated with rescue missions and they always have tons of huge prints that are usually not that cute. The frames are usually painted weird metal colors but have awesome details. I usually find these huge frames for around $5! Which is awesome. It takes some work to get the print and glass out but I think its worth it. To see how I gut these frames click

here

If you don't want to do all this you could just check your local craft store framing section and get an unfinished frame. They can me pretty inexpensive as well. 

I had already used this frame in another project for my old apartment so I had to prime it to cover up the red and then I just applied several thin coats of spray paint and let the frame dry completely between each coat.

A Love Worth Living For | Diy Decorative Framed Bulletin & Photo Board - Do it Yourself Thrifted Framed Inspiration & Vision Board.

While the frame was drying between coats, I worked on the clothes pins. I think this and the lace is what makes this project adorable. I wanted the pins to be super glittery. Because I was using a champagne glitter I went ahead and spray painted the sides of the pin with a champagne spray paint. I ordered tons of glitter and spray paint online from Joann's and Michael's back in October when we were DIYing the wedding.

A Love Worth Living For | Diy Decorative Framed Bulletin & Photo Board - Do it Yourself Thrifted Framed Inspiration & Vision Board.

After the spray paint dried, I took the pins back in and coated one side of them in tacky glue. I was going to use mode lodge for this step because that it what I usually use but decided to give a tackier glue a go.

A Love Worth Living For | Diy Decorative Framed Bulletin & Photo Board - Do it Yourself Thrifted Framed Inspiration & Vision Board.

After coating it I placed them in a glitter tray just dumped a bunch of glitter on top of them. (If you don't have a funnel try like this just use a sheet of paper so you can shake the glitter back into the container.) I DID NOT SHAKE OFF THE EXCESS UNTIL I WAS SURE THAT THE GLUE HAD HAD TIME TO DRY COMPLETELY. I love glittering things. More on that

here

. This is the best technique I have ever found. Using the tacky glue and not shaking off the excess until the glue is dry. I only had to use one coat. 

A Love Worth Living For | Diy Decorative Framed Bulletin & Photo Board - Do it Yourself Thrifted Framed Inspiration & Vision Board.

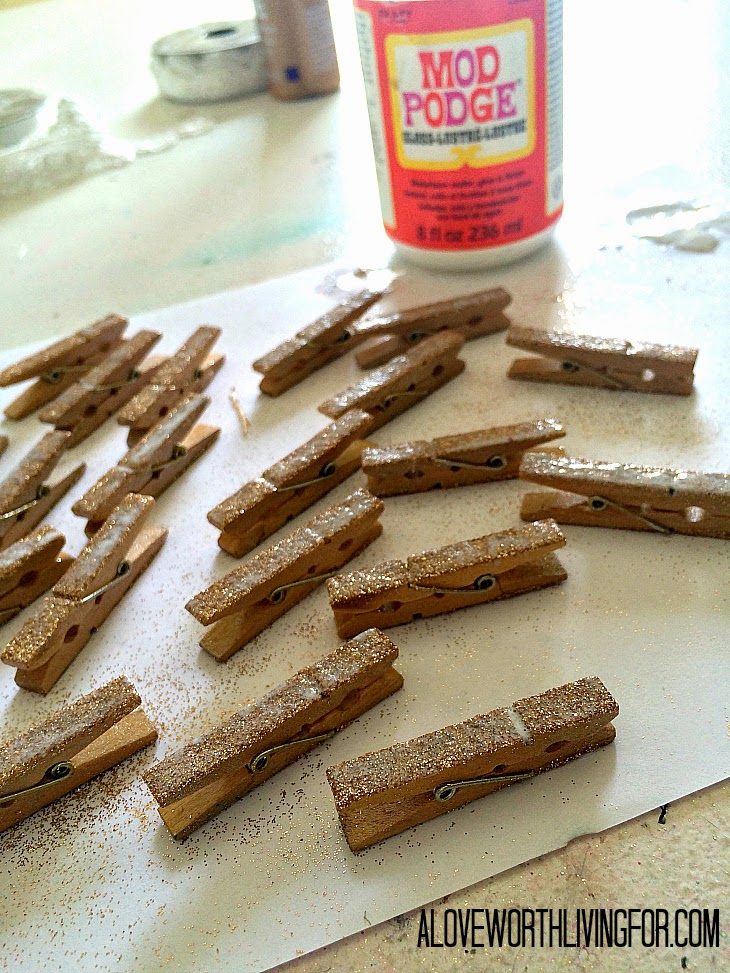
Even though the tacky glue worked super well, I still went ahead and sealed it all in with a coat of Mod Podge. This will keep the glitter from being rubbed off over time and will keep it off of your fingers every time you go to clip something to the board. 

A Love Worth Living For | Diy Decorative Framed Bulletin & Photo Board - Do it Yourself Thrifted Framed Inspiration & Vision Board.

By the time I was done with the pins the frame was good and dry. I brought it in and flipped it over so I could stretch out the lace trim across the back. I went ahead and pre-cut all the strips so that I knew how many strands I would have. I ended up using around 4 yards of trim for mine. After I had them laid out so I knew my spacing I began to hot glue them down. I glues all the trim down on one side and after the glue cooled I went to the other side and did the same. 

PRO TIP!: Canned air! It scares the crap out of me for some reason...maybe because the can gets so cold...it just freaks me out...am I the only one? Anyways this stuff rocks when hot gluing things! If you flip the can upside down and spray the glue with it, the air that comes out is so cold it like flash freezes the glue. Be super careful when doing it because the air and fluid that comes out is so cold it could burn you. But if you are brave enough to try it does cut down on time. 

A Love Worth Living For | Diy Decorative Framed Bulletin & Photo Board - Do it Yourself Thrifted Framed Inspiration & Vision Board.

Once all the pieces of trim were glues down I put some screws in the wall to hang it up!

A Love Worth Living For | Diy Decorative Framed Bulletin & Photo Board - Do it Yourself Thrifted Framed Inspiration & Vision Board.

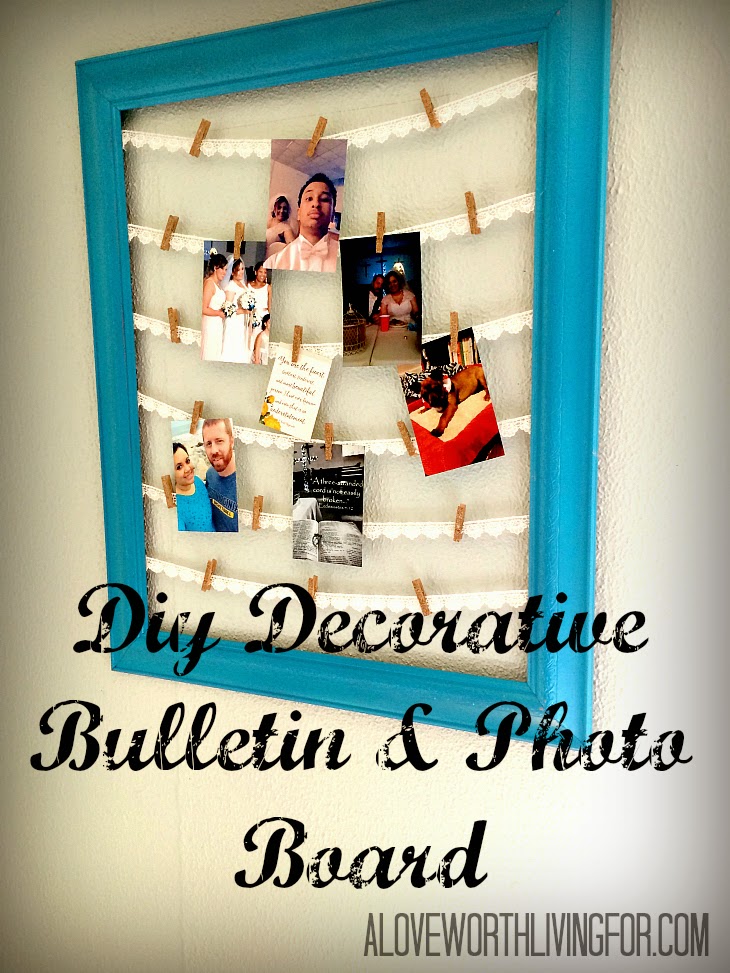
It's so pretty!! I am currently using it for photos but my ultimate plan is to use it as a vision/inspiration board for future projects and products!

A Love Worth Living For | Diy Decorative Framed Bulletin & Photo Board - Do it Yourself Thrifted Framed Inspiration & Vision Board.

What do you think?! If you decide to make one send me a picture on instagram! Use the hashtag

#livingforDIY

and come follow me so we can share pictures and ideas! 

Click here to follow me on Instagram.

Leave me suggestions of any DIYs you'd like to see next!

Thanks for coming by!

love y'all,

Signature
A Love Worth Living For | Diy Decorative Framed Bulletin & Photo Board - Do it Yourself Thrifted Framed Inspiration & Vision Board.

4 Life Changing Verses for Those Who Feel Forgotten

A Christian looks up from the struggles one day and realizes he doesn't remember the last time he felt the presence of God. He doesn't remember the last thing he heard Him say. He acknowledges that in the busyness of ministry he may have neglected his relationship with the Lord but he is startled by how far away He feels. The distance causes guilt and shame which is used by the enemy to deceive. The Christian feels forgotten.

This feeling comes in many packages. Each unique and each painful.

No one likes to be forgotten. No one likes to feel like everyone's hanging out without them. It hurts when we fill like we're nothing but an afterthought to those we love. Here are four of my favorite scriptures for when I'm feeling forgotten.

Read More

DIY Framed Wall Art Calender

DIY Framed Wall Art Calender - All you need to turn old outdated thrift store paintings into beautiful dry-erase wall calenders!!

How to make a lovely framed calender that looks like a work of art from thrifted frames. 

I have had this huge old ugly framed floral print in my craft room for years. I never could throw it out because it seemed like such a waste of an awesome frame! In November I got married and moved into a new house. That means a new craft space. I wanted a huge dry erase calender for the wall to keep my projects right in front of me. 

DIY Framed Wall Art Calender - All you need to turn old outdated thrift store paintings into beautiful dry-erase wall calenders!!

I love how it turned out. Now here's how I did it.

This is what you'll need:

DIY Framed Wall Art Calender - All you need to turn old outdated thrift store paintings into beautiful dry-erase wall calenders!!

and of course the frame.

DIY Framed Wall Art Calender - All you need to turn old outdated thrift store paintings into beautiful dry-erase wall calenders!!

Frames are super expensive I have noticed. However the thrift stores are over flowing with people's old prints from the 90's. You could get huge frames for under 5 bucks usually. I got this one, which is 29 1/2 x 23 1/2, from the local homeless shelter by trading them one of my painted canvases and taking this one off their hands. 

I don't think it's the print that I hate but the mat. Just not my style. The frame, however, is gorgeous!

DIY Framed Wall Art Calender - All you need to turn old outdated thrift store paintings into beautiful dry-erase wall calenders!!

So first things first. We gotta take this thing apart. The back usually has some king of paper covering it. once you rip that up, the print is usually just cardboard. Gharrah came to investigate. (:

DIY Framed Wall Art Calender - All you need to turn old outdated thrift store paintings into beautiful dry-erase wall calenders!!

The print and the glass are generally held in by staples. I just bend those staples all up using a butter knife and see if the guts will come out that way. If you can get it out without removing the staples this will make reassembling it sooooo much easier. 

DIY Framed Wall Art Calender - All you need to turn old outdated thrift store paintings into beautiful dry-erase wall calenders!!

After I had the glass and card board print out of the frame I put the glass somewhere safe, grabbed the frame and headed outside to spray paint it. I love the frame but the yellow gold just wasn't my style. Insetad I toned it down with some champagne spray paint. I let that dry and then sealed it with a clear coat. 

DIY Framed Wall Art Calender - All you need to turn old outdated thrift store paintings into beautiful dry-erase wall calenders!!

I left that to dry and went back inside to start working on the guts of the calender. First I took the print and flipped it over on my desk and covered the back of it with double sided tape.

DIY Framed Wall Art Calender - All you need to turn old outdated thrift store paintings into beautiful dry-erase wall calenders!!

Then I tool my roll of paper and just rolled it across the taped back of the print. I used a craft colored paper used for mailing things. Depending on the look you are going for, you could use any wrapping paper or bulletin board paper for a background.

DIY Framed Wall Art Calender - All you need to turn old outdated thrift store paintings into beautiful dry-erase wall calenders!!

Now just flip it over and trim around the edges and you have your foundation.!

DIY Framed Wall Art Calender - All you need to turn old outdated thrift store paintings into beautiful dry-erase wall calenders!!

Next comes the slightly more difficult part. Math. 

You are going to want to measure your frame and then figure out how big you want your calender day squares. I wanted an inch and a half margin around so I subtracted 3 inched from the height and width. Then I wanted to have margins that were a fourth of an inch in between the days so I subtracted another 3 inches from the both the height and the width. I took the width and divided that by 7 (days of the week) and that's how wide my squares are. Height wasn't such a big deal because I wanted space left.

I decided I wanted a colored border around mine so my blue squares are 2 3/4 inches and my white squares are 2 1/2 inches. I also made my day squares a half of an inch longer just because I liked the look of it. 

So once you have decided what size to make your squares you will need to cut seven for the days of the week and then 35 for five weeks worth of calender days. 

DIY Framed Wall Art Calender - All you need to turn old outdated thrift store paintings into beautiful dry-erase wall calenders!!

Once I had those cut I used more double sided tape to tape the white squares to the blue.

DIY Framed Wall Art Calender - All you need to turn old outdated thrift store paintings into beautiful dry-erase wall calenders!!

Then I layed out the days the way I wanted them and began to tape them down. It was around here that I realized I wanted a space or the month. I cut that out and spaced everything accordingly. 

DIY Framed Wall Art Calender - All you need to turn old outdated thrift store paintings into beautiful dry-erase wall calenders!!

Once I had all the days down, I wrote out the days of the week on the top row before I taped them down. I decided to hand write mine but you could use a cricut or sticker letters or even just print them out.

DIY Framed Wall Art Calender - All you need to turn old outdated thrift store paintings into beautiful dry-erase wall calenders!!

After I taped those down. I just measured what space was left at the bottom and cut out some large solid pieces of card stock that would fit perfect and taped them down as well.

DIY Framed Wall Art Calender - All you need to turn old outdated thrift store paintings into beautiful dry-erase wall calenders!!

After that you can decide if you want to add decorations or washi tape to it. I wanted mine clean and simple so I left mine minimal and slid the glass and then the calender back into place.

DIY Framed Wall Art Calender - All you need to turn old outdated thrift store paintings into beautiful dry-erase wall calenders!!

I just folded the staples back down to hold it all in and then mounted it on the wall.

DIY Framed Wall Art Calender - All you need to turn old outdated thrift store paintings into beautiful dry-erase wall calenders!!

I love how it turned out! If you DIY this then leave me pictures on instagram using the tag #WorthLivingFor!!

DIY Framed Wall Art Calender - All you need to turn old outdated thrift store paintings into beautiful dry-erase wall calenders!!

The More I Seek You

I wanna sit at Your feet
Drink from the cup in Your hand
Lay back against You and breathe
Feel Your heartbeat
This love is so deep, It's more than I can standI melt in Your peace, It's overwhelming.
Guys, this song has been on repeat in my mind all day. They even played at church this evening. That line... "Lay back against You and breathe, feel Your heartbeat" Is my prayer. I just want to fall into His embrace. It's the only place that I know of to run to knowing I can just rest.  In His presence I can breathe. His presence is like breathing and I have one of those moments where I realize that I have been holding my breath for far too long. I just need Him closer than my skin. I can't stand any space between us. I want to hear His heartbeat. I want to memorize His heart. 
I don't know if this is making any sense. I just keep thinking of Psalm 42 where David says, "Like the deer pants for the water, so my soul pants for you God. When can I get to this God?" I am desperate for this God. I can't live without Him. I can't breathe without Him. 
My soul is hungry for more of Him this evening. I love these kind of evening. May they never fade.